
Duryea’s panorama of Adelaide
Capturing a view of Adelaide in 1865 (and 1870)

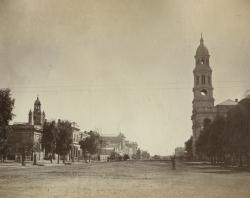
A view along King William Street with the Town Hall tower on the right, 1866. SLSA: B 73319/2

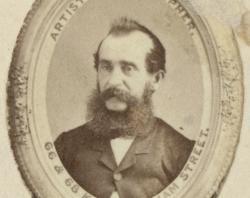
A small cameo portrait of a man, believed to be the photographer Townsend Duryea. Writing around the cameo reads 'Artist photographer - 66 & 68 King William Street,' 1866. SLSA: B 73320/1A

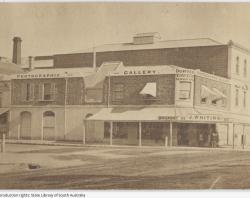
Photographic Gallery of Townsend Duryea, south east corner of Grenfell Street and King William Street. This building was destroyed by fire on 18 April 1875. Townsend Duryea was an American daguerreotypist who opened this studio in Adelaide in 1855. SLSA: B 5663
Carrying a camera, tripod, fragile glass plates and photographic chemicals up the tower, Duryea and his team began an ambitious project. Over about two weeks he carefully photographed the city in sections, fourteen images in total, each one taken from the same lofty vantage point.
When joined together, these photographs created something extraordinary: a sweeping 360-degree panorama of a young and growing Adelaide.
The images reveal a city in motion. Along Waymouth Street stand early commercial buildings. Timber yards sit beside the premises of architects English & Brown. On Franklin Street you can spot the Methodist Church, the coach works of Duncan & Fraser and the Windsor Castle Hotel. Open paddocks sit beside homes, workshops and small industries, with the parklands stretching out beyond.
The panorama circles past Victoria Square, showing the Supreme Court of South Australia on its southern side, then the Treasury Building and St Francis Xavier's Cathedral. Nearby stand the Unitarian Church on Wakefield Street and Stow Memorial Church, still under construction.
There’s even a glimpse of the Institute Building, still part of the State Library of South Australia today!
Duryea’s original prints were pasted onto a long strip of calico, each panel carefully aligned so the final image joined back to the first, forming a complete circle, a true cyclorama of the city.
Explore the 1865 plates

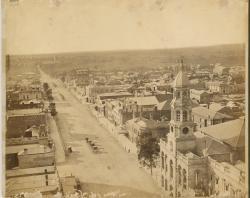
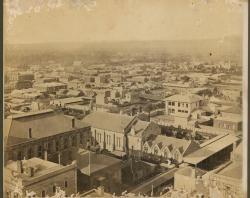
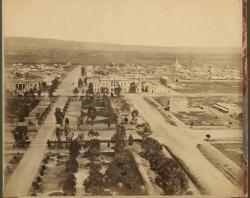
Panorama plate 1: View of Adelaide from the Town Hall Tower, 1865, looking towards North Adelaide down King William Street. Horse cabs line the centre of King William Road and the Gouger Fountain can be seen on the centre left. Roofs of buildings give way to the distant parkland and countryside beyond. SLSA: B 5099/1

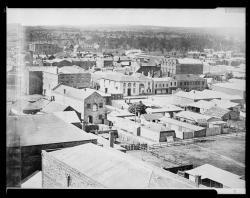
Panorama plate 2: View of Adelaide from the Town Hall Tower, looking north east. Grenfell Street runs across the centre of the view. The warehouse of George P. Harris, Wholesale Ironmonger (soon to become Harris Scarfe's) can be seen, upper right of centre. In the upper left of the view is the Institute Building and the mounted Police Barracks. Beyond the city buildings is the parklands and distant countryside. SLSA: B 5099/2

Panorama plate 3: View of Adelaide from the Town Hall Tower showing horse paddocks abutting Gawler Place. On the opposite side of Gawler Place are shingle roofed workman's cottages. A hotel, the 'Young Queen Inn' is in the centre of the view and Thomas Wells is the licensee at this time. Rooftops, parklands and foothills recede into the background. SLSA: B 5099/3

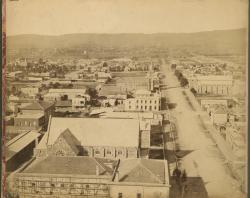
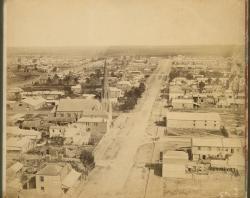
Panorama plate 4: View of Adelaide, looking east from the Town Hall Tower. Pirie Street cuts across the centre of the view, which shows shingle roofed workmen's cottages, open paddocks and a mix of city buildings. In the right foreground is the roof of the Pirie Street Methodist Church. On the upper left of the view is the Hindmarsh Square Congregational Church. Parklands, eastern suburbs and hills lie beyond. SLSA: B 5099/4

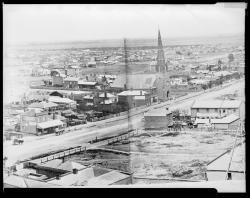
Panorama plate 5: View of Adelaide from the Town Hall Tower looking south east. Flinders Street cuts diagonally across this view. Two recently completed churches face each other across the road: On the left the Presbyterian, on the right the Baptist. City buildings give way to rural small holding and the hills make a backdrop. SLSA: B 5099/5

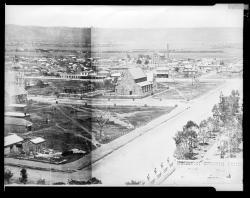
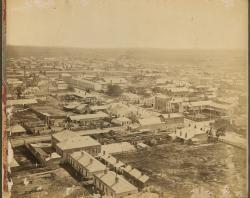
Panorama plate 6: View of south eastern Adelaide from the Town Hall Tower. Flinders Street cuts across the lower portion of the view. There is a mix of residential and light industrial buildings interspersed with paddocks, with rural land and hills in the background. Scaffolding in the foreground is attached to the Stow Church which is under construction. The English architect of Stow Church was fond of English wildlife so had a squirrel, carved in stone, at the front of the building. The church on the right is St. Andrews Presbyterian, which opened in 1859 and closed in 1904. On the north side of Wakefield street is the Unitarian Christian Church, completed in 1854, built by the same builder who later built the Town Hall. The Unitarian Church moved to Norwood in the early 1970s and the building on Wakefield street was lost. To the South West of the Unitarian Church, on Wakefield Street, is St. Francis Xavier Cathedral, which survives today. Businesses in the foreground; from extreme right, a cooperage, T. Hills' Cabinet Maker Upholsterer and Undertaker, and G. Gooden, Basketmaker. The two story building in the centre left is J. Dunn & Co.'s Grain and Flour stores. SLSA: B 5099/6

Panorama plate 7: View of southern Adelaide from the Town Hall Tower, city buildings gradually giving way to the parklands and hills. Victoria Square is on the left with the top of the Treasury building visible in the lower right corner. St. Francis Xavier Catholic Hall is under construction in the centre left next to St. Francis Xavier's Cathedral. The Unitarian Church is on the extreme left. SLSA: B 5099/7

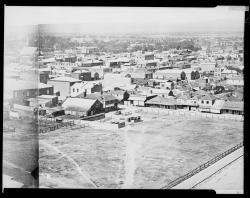
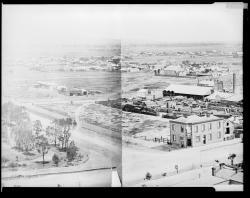
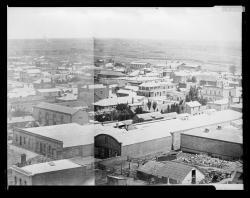
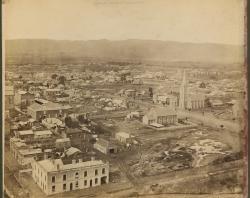
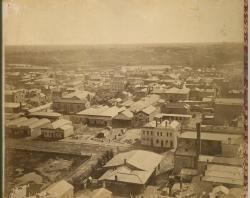
Panorama plate 8: View of southern Adelaide from the Town Hall Tower with Victoria Square in the foreground. Parklands, distant suburbs and hills are seen in the distance. On the centre left is the original Supreme Court building (completed in 1851), later to house the Magistrate's Courts. Near the centre is the Rainbow Tavern, Acre 407, Gouger Street, first licensed in 1853. The tall chimney on the right belongs to the Crown Steam Mill (on Mill Street) which was later to become Verco's Mill. In the distance on the south parklands are the rifle butts used by the militia for shooting practice. SLSA: B 5099/8

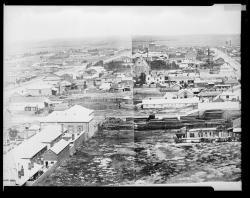
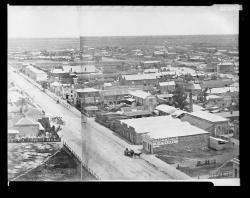
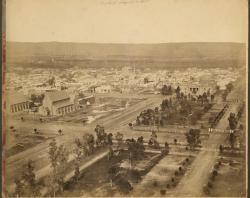
Panorama plate 9: View of south western Adelaide from the Town Hall Tower, featuring the intersection of Franklin Street and Victoria Square. Open paddocks, residential and business premises can be seen with parklands and hills in the distance. In the foreground is the Windsor Castle Hotel, licencee W. Haylock. The premises of Charles Farr, Builder and Timber Merchant displays a large array of cut timber in piles. SLSA: B 5099/9

Panorama plate 10: View of south western Adelaide from the Town Hall Tower with Franklin Street cutting across the view. The Maugham Methodist Church is dominant in this view of city buildings intersperced with open spaces with parklands in the distance. The two storey building on the left side of the church is Duncan & Fraser, Coach Builders. SLSA: B 5099/10

Panorama plate 11: View of Adelaide looking west from the Town Hall Tower, showing the part of the town between Franklin and Waymouth Streets. City buildings and business premises, churches and open paddocks stretch off into the distant parklands. A researcher has provided the following information: to the North-East of this image (bottom right), is where the Bonython family established a significant dynasty in the Advertiser Newspaper. The building was erected in the 1950s and demolished in the naughties. SLSA: B 5099/11

Panorama plate 12: View of Adelaide from the Town Hall Tower with Waymouth Street cutting across the left side of the view. City buildings are seen in the foreground, parklands in the distance. In the middle of the photograph is the premises of architect and builder English & Brown with its extensive yard containing piles of timber and other building materials. On the left is a monumental mason's yard. SLSA: B 5099/12

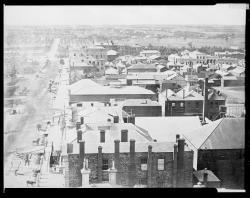
Panorama plate 13: View of Adelaide from the Town Hall Tower, between Waymouth and Currie Streets, looking north-west. City buildings give way to parklands and distant suburbs. The building in the foreground with the shingle roof is a livery stable and has hay for sale. SLSA: B 5099/13

Panorama plate 14: View of Adelaide from the Town Hall Tower looking north-west along King William Street across city buildings to the parklands and beyond. The white two-story building on the centre right is the Bank of Australasia on the intersection of King William and Currie Streets. The building with the verandah on its right is Green's Exchange. Lined up in the centre of the road are horse cabs, and on the Currie Street intersection is the Gouge's Fountain which will soon be removed for the Duke of Edinburgh's visit in 1867. Work is being done on the building in the left foreground as there is scaffolding on its facade and part of the roof is missing. SLSA: B 5099/14


Look closely and the panorama reveals even more. Shadows stretch across the streets from horse-drawn carriages and buildings. Conservation experts believe the changing shadows show Duryea began photographing around midday and finished the final plate later in the afternoon.
More than 160 years later, this remarkable panorama still offers a window into Adelaide’s past.
You can view a copy in the antechamber of the Institute Building at the State Library, stand before it and see what details you can discover.
The 1870 panorama
Five years later, Duryea would photograph Adelaide again, this time from the tower of the Adelaide General Post Office. The panorama consists of ten of Duryea's original photographic prints pasted in sequence onto board, which is folded into a box. It starts with a scene looking north down King William Street, then turning round in a clockwise direction.

1870 panorama panel 1: View of Adelaide looking north down King William Street towards North Adelaide, taken by Townsend Duryea from the tower of the Adelaide General Post Office in 1870. The Adelaide Town Hall is in the right foreground, and Government House, the S.A,. Institute and the Armoury Building can be seen along North Terrace. SLSA: B 16004/1

1870 panorama panel 2: View of Adelaide looking north-east to the Parklands and Hackney, taken by Townsend Duryea from the tower of the Adelaide General Post Office in 1870. The rear section of the Adelaide Town Hall is in the left foreground, with Pirie Street Methodist Church adjacent. Chalmers Presbyterian Church (later renamed Scots Church), the Adelaide Hospital, St Peter's College (at Hackney) and the Hindmarsh Square Congregational Church (with twin towers) can also be seen. SLSA: B 16004/2

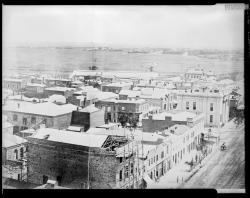
1870 panorama panel 3: View of Adelaide looking east down Flinders Street to the Parklands and eastern suburbs, taken by Townsend Duryea from the tower of the Adelaide General Post Office in 1870. The rear section of the Treasury Building, under construction, is in the foreground, with Stow Memorial Church (now Pilgrim Uniting Church) adjacent. Scots Presbyterian Church with its distinctive tower, (demolished after 1955), faces the Flinders Street Baptist Church across the road, with St Paul's Anglican Church, its tower unfinished, further down the street. In the background at left can be seen Prince Alfred College (at Kent Town) and the Hindmarsh Square Congregational Church (with its domed octagonal towers). The Earl of Zetland hotel can be seen on Flinders Street. SLSA: B 16004/3

1870 panorama panel 4: View of Adelaide looking south-east to Wakefield Street, the Parklands and the Parkside Lunatic Asylum, taken by Townsend Duryea from the tower of the Adelaide General Post Office in 1870. The Unitarian Church with its octagonal tower (demolished 1973) faces the St Francis Xavier Hall across the street (extreme right of image), with St Andrew's Presbyterian Church (demolished 1958) a little further down Wakefield Street. SLSA: B 16004/4

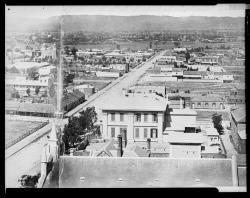
1870 panorama panel 5: View of Adelaide looking south into Victoria Square, taken by Townsend Duryea from the tower of the Adelaide General Post Office in 1870. The unfinished St Francis Xavier (Catholic) Cathedral and the Supreme Court Building, completed in 1851, can be seen. SLSA: B 16004/5

1870 panorama panel 6: View of Adelaide looking south into Victoria Square, taken by Townsend Duryea from the tower of the Adelaide General Post Office in 1870. The Supreme Court and the Local and Insolvency Courts, with the Draper Memorial Church and its Gothic spire (demolished in 1971), on the corner of Gilbert and Norman Streets, can be seen. In the South Parklands the raised structures appear to be targets for rifle training. SLSA: B 16004/6

1870 panorama panel 7: View of Adelaide looking south-west, taken by Townsend Duryea from the tower of the Adelaide General Post Office in 1870. In the foreground can be seen the business of C. Farr, builder & timber merchant, with Grote Street crossing diagonally through the image. In the middle background of the view can be seen St. Luke's Anglican Church (consecrated in 1856), on the western edge of Whitmore Square, and behind it, the road to Glenelg. SLSA: 16004/7

1870 panorama panel 8: View of Adelaide looking west down Franklin Street, taken by Townsend Duryea from the tower of the Adelaide General Post Office in 1870. In the left foreground can be seen the Methodist New Connexion Church (later Maughan Methodist Church, demolished in 1964). At right, on the edge of the image, is the Bible Christian Church in Young Street, demolished in 1979. At the far end of Franklin Street, on West Terrace, is the flagstaff, where different signals were hoisted to indicate what vessels were passing up and down the gulf. SLSA: B 16004/8

1870 panorama panel 9: View of Adelaide looking north-west, taken by Townsend Duryea from the tower of the Adelaide General Post Office in 1870. Waymouth Street crosses diagonally through the image, and Light Square with Colonel William Light's memorial, can be seen in the left centre. Several timber businesses and a monumental mason's works are along Waymouth Street. SLSA: B 10064/9

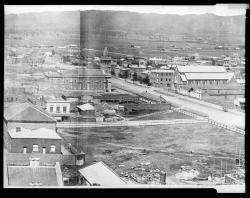
1870 panorama panel 10: View of Adelaide looking north, taken by Townsend Duryea from the tower of the Adelaide General Post Office in 1870, Waymouth Street crossing the foreground of this image. The names of many businesses can be read on building signs in this view. The Victoria Bridge crossing the River Torrens on Montefiore Road to North Adelaide, the early railway station buildings and the first Parliament House along North Terrace can be seen. SLSA: B 10064/10

Written by Laura Wolfe, Digital Engagement Officer